博客
Multi-room audio with Snapcast, Mopidy, and Home Assistant
Would you like to listen to music in every room in your home, controlled from one source? Then multi-room audio is for you.
Multi-room audio can be achieved by having a computer attached to speakers in every room. On each computer, services run to play and/or control the audio. With this DIY approach, the kind of computer and speakers is very much up to you. It could be your desktop computer with attached powered speakers, your HTPC hooked up to your TV and receiver, a Raspberry Pi with Amp or DAC, or even an Android device.
You’ll need two key software packages, besides Home Assistant. The first is Mopidy
Finally, you also need a player to control Mopidy. Any MPD-compatible player will work, and there are several Mopidy-only web-based options
Home Assistant will provide device status, and volume control for each room. If you want to play music in all your rooms (on all your clients), access the server instance of Mopidy. If you want to play music only in a specific room, access that specific Mopidy instance. If you’re using a web UI for Mopidy, you can add links to each instance in Home Assistant with the weblink component.

0.13: Speedtest.net, Bloomsky, Splunk and Garage Doors
 Paulus Schoutsen
The focus of 0.13 was on test coverage, big cheers to @rmkraus
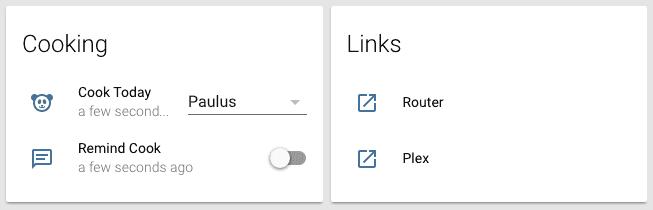 Examples of the new [input_select] and weblink components.
Not only did we gain a lot of test coverage, we also attracted a lot of new developers that contributed a variety of components and platforms:


- Core: Add service to restart Home Assistant (@rmkraus
) - Core: Allow device to report as unavailable (@MartinHjelmare
) - Core: Allow overriding polling interval in platforms and via config (@balloob
) - Frontend: support for a default view have been added to replace the show all view (@balloob
) - Component: Added apcupsd component (@flyte
) - Component: Added component to log values to Splunk (@miniconfig
) - Component: Added garage door component including Wink support (@xrolfex
) - Component: Added input_select component (@balloob
) - Component: Added proximity component to track people closest to a location (@nickwaring
, @Bart274 ) - Component: Added support for Bloomsky Weather Station (@haraldnagel
) - Component: Added support for pushing stats to graphite (@kk7ds
) - Component: Added support for SCSGate devices (@flavio
) - Component: Added weblink component to link to other pages (@MagnusKnutas
) - Component: Support for Ubiquiti mFI sensors and switchable devices added (@kk7ds
) - Alarm control panel: Added Caddx/GE/Interlogix NetworX support (@kk7ds
) - Camera: MJPEG camera’s will now show real stream instead of a 2fps stream (@stjohnjohnson
) - Camera: Added Unifi video cameras support (@kk7ds
) - Device Tracker: Aruba platform now uses SSH instead of telnet (@carlosmgr
) - History: Show correct graphs for thermostats (@sdague
) - Light: Added MySensors support (@MartinHjelmare
) - Lock: Added Verisure support (@turbokongen
) - Media Player: Added Samsung TV support (@stefan-jonasson
) - Media Player: Added Snapcast support (@happyleavesaoc
) - MQTT: Allow using templates in publish service (@flyte
) - Notify: Added REST support (@Theb-1
) - Sensor: Added Speedtest.net support (@nkgilley
) - Switch: Added template platform (@pavoni
) - Thermostat: Support for Honeywell in the US added (@kk7ds
) - Z-Wave: Allow configuring polling and support scenes (@lukas-hetzenecker
) - Bug fixes and improvements by @persandstrom
, @fabaff , @balloob , @pavoni , @philipbl , @MartinHjelmare , @rmkraus , @molobrakos , @lukas-hetzenecker , @TangoAlpha , @deisi , @Danielhiversen , @roqeer , @jaharkes
Classifying the Internet of Things
The core of home automation is knowing what’s going on. The faster we know about a state change, the better we can serve the user. If you want to have your lights to turn on when you arrive at home, it doesn’t help if it only knows about it after you’ve already opened the door and manually (!!) turned on the lights.
Each smart device consists of the ‘normal’ device and the piece that makes it ‘smart’: the connectivity. The connectivity part of a device can consists of either control, state or both.
State describes what a device is up to right now. For example, a light can be on with a red color and a medium brightness.
Control is about controlling the smart device by sending commands via an API. These commands can vary from configuring how a device works to mimicking how a user would interact with a device. A media player can allow skipping to the next track and a sensor could allow to configure its sensitivity or polling interval.
The Home Assistant APIs are setup to be as convenient as possible. However, a network is always as weak as it’s weakest link. In our case these are the integrations. Take for example controlling a light that does not report state. The only state Home Assistant can report on after sending a command is the assumed state: what do we expect the state of the light to be if the command worked.
We want our users to get the best home automation experience out there and this starts with making sure they have devices that work well with Home Assistant. That’s why we will start applying the following classifiers to our integrations:
| Classifier | Description | |
|---|---|---|
| Assumed State | We are unable to get the state of the device. Best we can do is to assume the state based on our last command. | |
| Cloud Polling | Integration of this device happens via the cloud and requires an active internet connection. Polling the state means that an update might be noticed later. | |
| Cloud Push | Integration of this device happens via the cloud and requires an active internet connection. Home Assistant will be notified as soon as a new state is available. | |
| Local Polling | Offers direct communication with device. Polling the state means that an update might be noticed later. | |
| Local Push | Offers direct communication with device. Home Assistant will be notified as soon as a new state is available. | |
The background to how we got to these classifiers can be read after the break.
Read on →Smarter SmartThings with MQTT and Home Assistant
This is a guest post by Home Assistant users Jeremiah Wuenschel
So you own a SmartThings
You spent your weekend getting everything set up, showing it off to your significant other, but in the end you got stumped when it came to integrating with all your existing SmartThings toys. What do I do now? Should I buy another hub? Should I just buy a Z-Wave stick?
That’s where we came in. We wanted a solution that can bridge the awesomeness of Home Assistant with the SmartThings hub that works with almost everything.
0.12: Insteon, LIFX, Twitter and Zigbee
Another sprint has come to an end and it seems that we have not slowed down a single bit 🚀. 0.12 is full of new components, platforms and organizational additions.
I would like to give a shout out to Greg Dowling (@pavoni)
This release includes a very frequent requested feature: the ability to organize entities in different tabs in the frontend. See the demo to see this in action and read more in the group documentation how to get started.
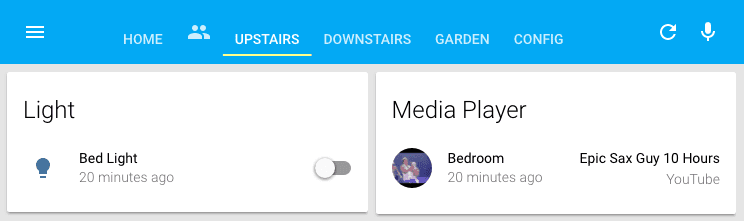 Example of the new views in the frontend. Learn more.


- Binary sensor: command sensor added (@Bart274
) -
Nest support extended to include sensors and binary sensors (@joshughes
) - Light: LIFX platform added (@TangoAlpha
) - Notify: Twitter platform added (@HydrelioxGitHub
) - Sensor: Template platform added (@pavoni
) - Switch: Wink platform now supports sirens (@w1ll1am23
) -
Insteon hub support added (@FreekingDean
) -
Statsd component added (@michaelkuty
) - Light: Rfxtrx platform now supports dimming (@turbokongen
) - Time scheduling (including time automation) now works with intervals (ie.
/5) (@kennedyshead) - Sensor: onewire support added (@deisi
) -
Zigbee support added (@flyte
) - Device Tracker: OwnTracks can now track iBeacons (@pavoni
) - Notify: Google Voice SMS platform added (@w1ll1am23
) - Toggle service added to
homeassistant,switch,lightandmedia_player(@rmkraus) -
Thermostat services added to control fans (@auchter
) - Improved Python automation: Event helpers are now also available as decorators for custom components (@rmkraus
) - Frontend: support added for tabs to show different views of your house (@balloob
) - Bugfixes by @molobrakos
, @MartinHjelmare , @pavoni , @trollkarlen , @zmrow , @maddox , @persandstrom , @happyleavesaoc , @balloob , @fabaff , @stefan-jonasson , @haraldnagel .
Backwards incompatible changes
- Nest config has moved from thermostat to the Nest component.
- Entity IDs for Z-Wave devices are now generated in a deterministic way causing all IDs to change starting this release. This is a one time change. (Changed again in 0.31)
Perfect Home Automation
People often ask me about my vision for Home Assistant. Before I can describe where I want to go with Home Assistant, I should first talk about how home automation would look in my ideal world. This will be the aim of this post. I’m not going to focus on protocols, networks or specific hubs. That’s all implementation details. Instead, this post will focus on what is most important: the interaction between the users and their home.
You should not have to adapt to technology.
When people start using home automation, they always experience home control first: being able to control devices in new ways using a phone or computer. They believe the future is now and their app will be their remote for their lives. They only focus on what they are getting, not on what they are losing. You install some light bulbs and all of a sudden you are no longer able to use the light switches. You’ll arrive at home at night and have to pull out your phone, open the app, let it connect and finally you’ll be able to turn on the light. All while turning the light on could have been a switch away.
Yes, you can solve this with presence detection. What if your phone runs out of battery? You’ll have to resort to the switch again.
If you find that using your new home devices is cumbersome, the promise of home automation technology has failed you. Your lights should work with both a switch (or button) at the entrance of your room and via presence detection. Honestly, there are hardly any valid use cases for being able to control lights from your phone except for showing off.
Read on →0.11: Extended support for DIY solutions
First release of 2016 and we are on 🔥! The main repository
![]()


-
MySensors revamped and switch support added (@MartinHjelmare
) - Full refactor of RPi GPIO. Now includes binary sensor and switch (@sfam
) - Sensor: [YR] platform added (@danielhiversen
) - Device Tracker: Geofancy platform has been renamed to Locative (@philipbl
) - Automation: Add sun condition (@philipbl
) - Switch: command_switch can now poll for state (@happyleavesaoc
) - Switch: wemo now uses subscription to states instead of polling (@pavoni
) -
Telldus Live support added (@molobrakos
) -
Vera now uses subscription to states instead of polling (@pavoni
) - New template helper method
is_state_attr(entity_id, name, value)added (@andythigpen) - Device tracker: OwnTracks transition events now supported (@xifle
) - Light: Philips Hue platform now supports multiple hubs (@rhooper
) - Notify: Free Mobile platform added (@HydrelioxGitHub
) - New MQTT Eventstream component to connect two Home Assistant instances over MQTT (@moonshot
) - Media player: Cast huge stability improvements (@rmkraus
) - Media Player: Universal media player added to combine multiple media players (@rmkraus
) - Sensor: Netatmo platform added (@HydrelioxGitHub
) - Alarm Control Panel: [Alarm.com] platform added (@Xorso
) - Thermostat: Proliphix platform added (@sdague
) - New component input_boolean will allow for customizing automation (@balloob
) - Support calling services via Amazon Echo (@balloob
)
Backwards incompatible changes
- The RPi.GPIO sensor platform has been moved to the
binary_sensorcomponent. - MySensors sensor platform now requires the MySensors component to be configured.
- Geofancy platform has been renamed to Locative.
0.10: Amazon Echo, iCloud, Dweet.io, Twitch and templating support!
Alrighty, it’s time for Home Assistant 0.10. A lot amazing things have changed and sadly we also had to introduce a bunch of backwards incompatible changes. I would like to give a big shoutout to Philip Lundrigan (@philipbl


- Device tracker: iCloud platform added (@xorso
, @kevinpanaro ) - Frontend: Improved caching using service workers if served over SSL (@balloob
) - Sensor: Twitch platform added (@happyleavesaoc
) -
Template support (@balloob
, @philipbl , @fabaff ) - Thermostat: Heatmiser platform added (@andylockran
) - Sensor: Dweet.io platform added (@fabaff
) -
Alexa/Amazon echo component added (@balloob
) - Device Tracker: FritzBox platform added (@deisi
, @caiuspb ) - Sensor: Wink now supports the Egg minders (@w1ll1am23
) - Sensor: ELIQ Online platform added (@molobrakos
) - Binary sensor: REST platform added (@fabaff
) - Sensor: Torque (OBD2) platform added (@happyleavesaoc
)
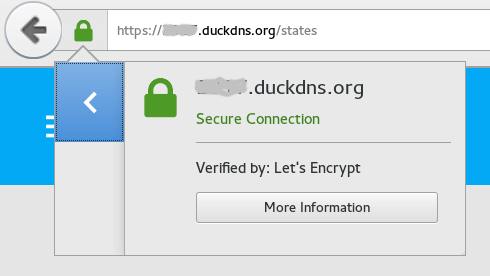
Set up encryption using Let's Encrypt
Exposing your Home Assistant instance outside of your network always has been tricky. You have to set up port forwarding on your router and most likely add a dynamic DNS service to work around your ISP changing your IP. After this you would be able to use Home Assistant from anywhere but there is one big red flag: no encryption.
This tutorial will take you through the steps to setup a dynamic DNS for your IP and allow trusted encrypted connection to it - for free using DuckDNS
[Update: decision reversed!] Philips Hue blocks 3rd party lights
Update Dec 16: Great news! Philips has decided to reverse their decision
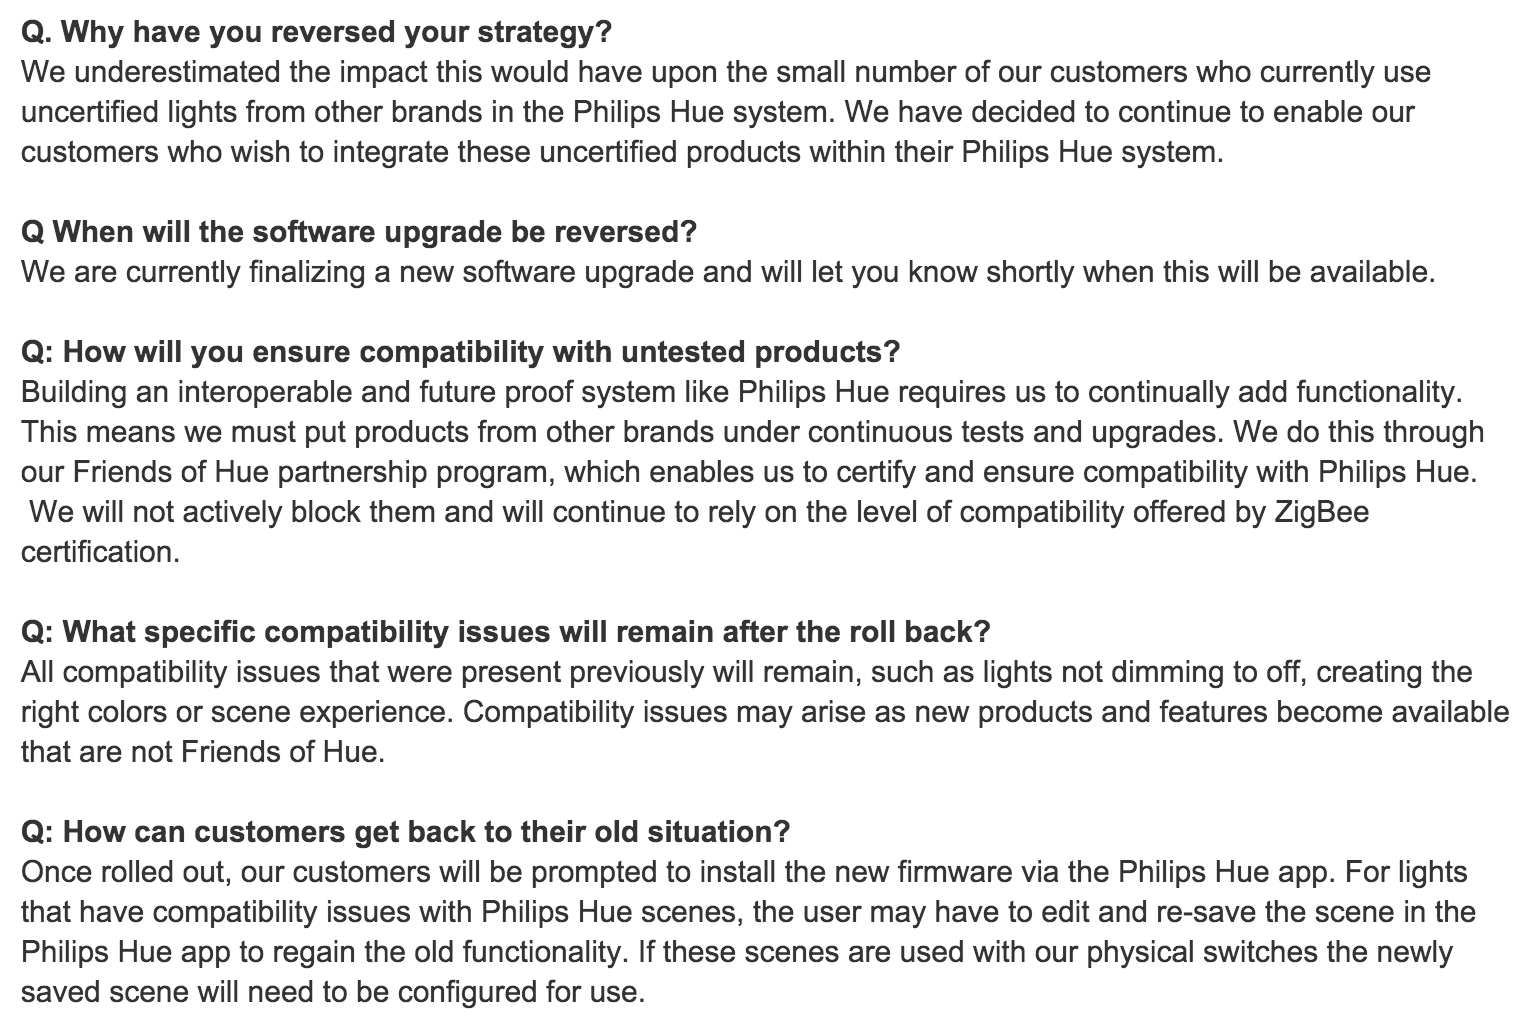 Philips Hue FAQ entries regarding reversing the decision.
Original post:
Read on →