HaveIBeenPwned
The haveibeenpwned sensor integration集成将 Home Assistant 与您的设备、服务等连接和集成。 [Learn more] creates sensors that check for breached email accounts on haveibeenpwned
Configuration
In order to use this integration you need to purchase an API key. Visit the API key page
Configuration
To enable this sensor, add the following lines to your configuration.yamlconfiguration.yaml 文件是 Home Assistant 的主要配置文件。它列出了要加载的集成及其特定配置。在某些情况下,需要直接在 configuration.yaml 文件中手动编辑配置。大多数集成可以在 UI 中配置。 [Learn more] file. It will list every specified email address as a sensor showing the number of breaches on that email account.
在更改了configuration.yamlconfiguration.yaml 文件是 Home Assistant 的主要配置文件。它列出了要加载的集成及其特定配置。在某些情况下,需要直接在 configuration.yaml 文件中手动编辑配置。大多数集成可以在 UI 中配置。 [Learn more] 文件后,重启 Home Assistant 以应用更改。 该集成现在显示在集成页面的 设置 > 设备与服务 下。其实体在集成卡片上以及实体标签上列出。
# Example configuration.yaml entry using cloud based emoncms
sensor:
  - platform: haveibeenpwned
    email:
      - your_email1@domain.com
      - your_email2@domain.com
    api_key: API_KEY
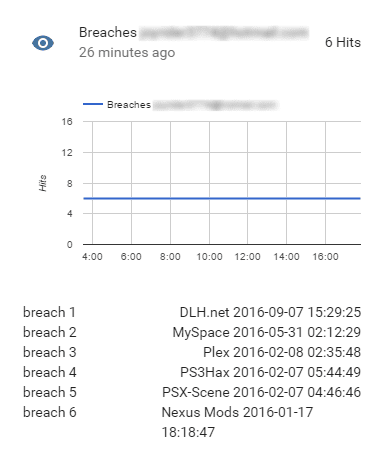
Breach meta data
If one of your email accounts is breached the sensor will display breach meta data. It will list the title of the site where your email
account has been breached as well as the added date of the breach data. This data is displayed in descending order so that the state attribute
breach 1 will always contain the last known breach for the specific email account, if there are any breaches detected.
The sensor will scan all email addresses specified with a 5 second delay between all breach data requests on Home Assistant startup. After this initial startup scanning, the sensor will only scan one email account per 15 minutes to prevent abuse, and not hammer “the Have I been Pwned” service, as this breach data almost never changes.