Google Maps Travel Time
The google_travel_time sensor provides travel time from the Google Distance Matrix API
Setup
You need to register for an API key by following the instructions here
Google now requires billing
A quota can be set against the API to avoid exceeding the free credit amount. Set the ‘Elements per day’ to a limit of 645 or less. Details on how to configure a quota can be found here
Starting March 2025 Google will change the pricing scheme from the US$200 per month credit to 10,000 free requests. You should adjust your limit to 322 or less. You can find more information on the pricing changes in the Google developer documentation
配置
要将 Google Maps Travel Time integration 添加到您的 Home Assistant 实例中,请使用此 My 按钮:

如果上述 My 按钮不起作用,您也可以手动执行以下步骤:
-
浏览到您的 Home Assistant 实例。
-
转到
设置 > 设备与服务。 -
在右下角,选择
Add Integration 按钮。 -
从列表中选择 Google Maps Travel Time。
-
按照屏幕上的说明完成设置。
Notes:
- Origin and Destination can be the address or the GPS coordinates of the location (GPS coordinates have to be separated by a comma). You can also enter an entity ID that provides this information in its state, an entity ID with latitude and longitude attributes, or zone friendly name (case sensitive).
Dynamic Configuration
Tracking can be setup to track entities of type device_tracker, zone, sensor and person. If an entity is placed in the Origin or Destination then every 5 minutes when the platform updates it will use the latest location of that entity.
Examples
Tracking entity to entity
Origin: device_tracker.mobile_phone Destination: zone.home
Tracking entity to zone friendly name (e.g. “Eddies House”)
Origin: zone.home Destination: Eddies House
Entity Tracking
-
device_tracker
- If state is a zone then the zone location will be used
- If state is not a zone it will look for the longitude and latitude attributes
-
zone
- Uses the longitude and latitude attributes
- Can also be referenced by just the zone’s friendly name found in the attributes.
-
sensor
- If state is a zone or zone friendly name then will use the zone location
- All other states will be passed directly into the Google API
- This includes all valid locations listed in the Configuration Variables
Updating sensors on-demand using Automation
Using automatic polling can lead to calls that exceed your API limit, especially when you are tracking multiple travel times using the same API key. To use more granular polling, disable automated polling.
You can use the homeassistant.update_entity action to update the sensor on-demand. For example, if you want to update sensor.morning_commute every 2 minutes on weekday mornings, you can use the following automation:
- alias: "Commute - Update morning commute sensor"
  initial_state: "on"
  triggers:
    - trigger: time_pattern
      minutes: "/2"
  conditions:
    - condition: time
      after: "08:00:00"
      before: "11:00:00"
    - condition: time
      weekday:
        - mon
        - tue
        - wed
        - thu
        - fri
  actions:
    - action: homeassistant.update_entity
      target:
        entity_id: sensor.morning_commute
For more detailed steps on how to define a custom polling interval, follow the procedure below.
Defining a custom polling interval
如果您想要定义一个特定的间隔来轮询您的设备以获取数据,可以禁用默认的轮询间隔并创建自己的轮询自动化。
要添加自动化:
- 转到 设置 > 设备与服务,并选择您的集成。
- 在集成条目上,选择
。 - 然后,选择 系统选项 并切换按钮以禁用轮询。
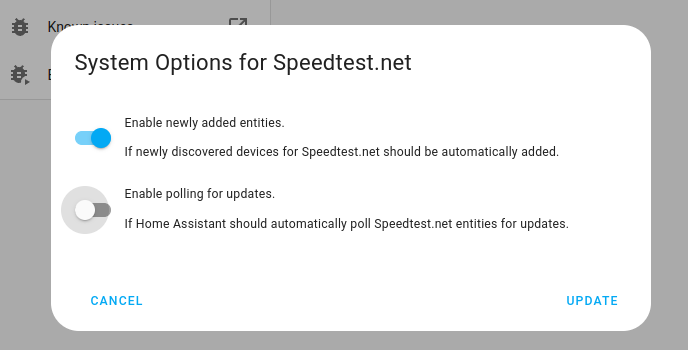
- 然后,选择 系统选项 并切换按钮以禁用轮询。
- 要定义您的自定义轮询间隔,创建一个自动化。
- 转到 设置 > 自动化与场景 并创建一个新的自动化。
- 定义您喜欢的任何触发器和条件。
- 选择 添加动作,然后选择 其他动作。
- 选择 执行动作,然后从列表中选择
homeassistant.update_entity动作。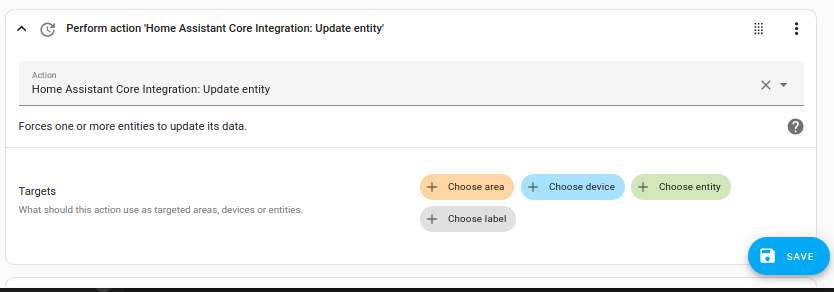
- 保存您的新自动化以轮询数据。