Google Assistant SDK
The Google Assistant SDK integration allows Home Assistant to interact with Google Assistant. If you want to use Google Assistant (for example, from your phone or Google Home device) to interact with your Home Assistant managed devices, then you want the Google Assistant integration.
This integration allows:
- Sending text commands to Google Assistant to control devices supported by Google Assistant but not by Home Assistant. Examples:
- Set Nest Guard to home and guarding
- Start vacuuming
- Stream front door on living room TV
- Turn off kitchen TV
- Play rain sounds on bedroom speaker
- Broadcast messages to Google Assistant speakers and displays without interrupting music/video playback. Examples:
- Coffee is ready
- Someone is at the front door
- Smoke detected in the master bedroom
- Water leak detected in the master bathroom
- Playback Google Assistant audio response for any query on any media player. Examples:
- Tell me a joke
- Say the ABC
- Sing happy birthday
- What does the elephant say?
- Having a conversation with Google Assistant using the conversation integration via text or voice.
Prerequisites
You need to configure developer credentials to allow Home Assistant to access your Google Account. These credentials are the same as the ones for Nest or Google Sheets, YouTube, and Google Mail.
情景 1:您已经拥有凭据
在这种情况下,您需要做的就是启用 API:
- 转到 Google 开发者控制台 Google Assistant API
。 - 确认项目并 启用 API。
- 按照 配置 部分中描述的步骤继续进行。
情景 2:您尚未设置凭据
在这种情况下,您需要先生成一个客户端密钥:
生成客户端 ID 和客户端密钥
本节说明如何在 Google 开发者控制台
- 首先,转到 Google 开发者控制台以启用 Google Assistant API
。 - 选择 创建项目,输入项目名称并选择 创建。
- 启用 Google Assistant API。
- 导航到 API 和服务(左侧边栏) > 凭据
。 - 在左侧边栏,选择 OAuth 同意屏幕。
- 选择 外部 并 创建。
- 将 应用名称(请求同意的应用程序名称)设置为您想要的任何名称,例如 Home Assistant。
- 您需要选择一个 支持电子邮件。
- 从下拉菜单中选择您的电子邮件地址。
- 在 开发者联系信息 下,输入您的电子邮件地址(可以与上面的相同)。
- 向下滚动并选择 保存并继续。
- 您不需要在这里填写其他任何内容。添加此页面的其他信息(如应用标志)可能会触发 Google 的额外审核过程,并导致设置延迟几天。
- 然后,您将自动进入 范围 页面。
- 您不需要在此处添加任何范围。选择 保存并继续 以移至 测试用户 页面。
- 您不需要在 测试用户 页面添加任何内容。选择 保存并继续,这将带您到 摘要 页面。
- 选择 返回仪表板。
- 重新选择 OAuth 同意屏幕 并在 发布状态 下选择 发布应用。
- 否则您的凭据将每7天到期。
- 确保 发布状态 设置为 在生产中。
- 在左侧边栏中,选择 凭据,然后选择 创建凭据(在屏幕顶部),再选择 OAuth 客户端 ID。
- 将 应用程序类型 设置为 Web 应用程序,并给这个凭据集命名(例如 “Home Assistant Credentials”)。
- 将
https://my.home-assistant.io/redirect/oauth添加到 授权重定向 URI 中,然后选择 创建。- 这不是占位符。它是必须使用的 URI。
- 然后,您将看到一个弹出窗口,显示 OAuth 客户端已创建,显示 您的客户端 ID 和 您的客户端密钥。
- 请记下这些(例如,将其复制并粘贴到文本编辑器中),因为您稍后需要它们。
- 记下这些字符串后,选择 确定。
- 如果您在任何时候需要再次查找这些凭据,请导航到 API 和服务 > 凭据,您将在 OAuth 2.0 客户端 ID 下看到 Home Assistant Credentials(或您在上一步中命名的任何名称)。
- 要查看 客户端 ID 和 客户端密钥,请选择铅笔图标。这将带您进入这些凭据的设置页面,信息将在页面右侧显示。
- 恭喜您!您现在是客户端密钥的保管者。将其保存在您的宝藏箱中。在大多数情况下,您的新凭据将在几分钟内激活。然而,Google 表示在某些情况下激活可能需要多达五小时。
配置
要将 Google Assistant SDK service 添加到您的 Home Assistant 实例中,请使用此 My 按钮:

如果上述 My 按钮不起作用,您也可以手动执行以下步骤:
-
浏览到您的 Home Assistant 实例。
-
转到
设置 > 设备与服务。 -
在右下角,选择
Add Integration 按钮。 -
从列表中选择 Google Assistant SDK。
-
按照屏幕上的说明完成设置。
The integration setup will next give you instructions to enter the Application Credentials (OAuth Client ID and Client Secret) and authorize Home Assistant to access your Google Assistant API.
Authorization steps
-
Continue through the steps of selecting the account you want to authorize.
-
If your Google account settings are set to a language not supported by the SDK – which can be noticed by the authentication screen of Google being localized in that language – the authorization will fail without a clear error. Changing the language at the bottom of the error page to one that is supported
by the SDK will allow you to continue to the link page of Home Assistant. -
NOTE: You may get a message telling you that the app has not been verified and you will need to acknowledge that in order to proceed.
-
You can now see the details of what you are authorizing Home Assistant to access with two options at the bottom. Click Continue.
-
The page will now display Link account to Home Assistant?, note Your instance URL. If this is not correct, please refer to My Home Assistant. If everything looks good, click Link Account.
-
You may close the window, and return back to Home Assistant where you should see a Success! message from Home Assistant.
Enable personal results (for advanced users)
This guide shows you how to enable personal commands such as “remind me tomorrow at 9 pm to take out the trash”.
This guide is for advanced users only. It requires creating an OAuth client ID of the Desktop app, running a Python program on your desktop or laptop, copying the resulting credentials to your Home Assistant config files, and likely running an Android emulator.
Prerequisites
- Successfully installed the Google Assistant integration.
Create credentials
- Navigate to Google Developers Console > Credentials
. - Select the project you created earlier from the dropdown menu in the upper left corner.
- Select Create credentials (at the top of the screen), then select OAuth client ID.
- Set the Application type to Desktop app and give this credential set a name (like “Home Assistant Desktop Credentials”).
- Select Create.
- In the OAuth client-created screen, select Download JSON.
- Rename the downloaded file to
client_secret.json. - On your Windows, Linux, or Mac machine, download Python if you don’t have it already.
- Open the terminal (on Windows, select Start and then type
cmd). - In the terminal, run the following commands (preferably in a Python virtual environment):
python -m pip install --upgrade google-auth-oauthlib[tool]
- Under Windows:
google-oauthlib-tool --scope https://www.googleapis.com/auth/assistant-sdk-prototype --scope https://www.googleapis.com/auth/gcm --save --client-secrets %userprofile%\Downloads\client_secret.json - Under Linux:
google-oauthlib-tool --scope https://www.googleapis.com/auth/assistant-sdk-prototype --scope https://www.googleapis.com/auth/gcm --save --client-secrets ~/Downloads/client_secret.json - Result: A browser window will open, asking you to select the account to continue to the cloud project you created earlier.
- Once you select the correct account, select both checkboxes:
- Use your Google Assistant: broad access to your Google account
- Send information to your Android device
- Select Continue.
- Result: If everything was successful, you will get a The authentication flow has completed. You may close this window message in your browser.
- In your terminal you will see the path where the credentials were saved. For example:
credentials saved: C:\Users\user\AppData\Roaming\google-oauthlib-tool\credentials.json
- Open the
credentials.jsonin a text editor. Keep it open since you will need to copy several values from it. - In the file editor of your Home Assistant, typically http://homeassistant.local:8123/core_configurator
, open /homeassistant/.storage/application_credentials.
- Locate the entry for
google_assistant_sdkand modifyclient_idandclient_secretto match the ones fromcredentials.json. - Save the file.
- Open
/homeassistant/.storage/core.config_entries.
- Locate the entry for
google_assistant_sdkand modifyrefresh_tokento match the one fromcredentials.json. - Save the file.
- Restart Home Assistant.
Enable personal results
- Go to Developer Tools > Actions and issue a query that requires personal results, for example call
google_assistant_sdk.send_text_commandwithcommand: "what is my name" - On your phone, you should receive a notification Allow personal answers Allow Google Assistant to answer your questions about your calendar, trips, and more.
- DO NOT tap on ALLOW (it won’t work until you enter a device name). Instead, tap on the notification text.
- If the app doesn’t open, you need to retry on a device running Android 12. If you don’t have such a device, you can use an Android emulator.
- Tap on Device Name, enter any device name (like Home Assistant), and tap on OK.
- Only after having a non-empty device name, enable the checkbox next to Personal results.
Troubleshooting
If you have an error with your credentials you can delete them in the Application Credentials user interface.
If commands don’t work try removing superfluous words such as “the”. E.g. “play rain sounds on bedroom speaker” instead of “play rain sounds on the bedroom speaker”.
If broadcasting doesn’t work, make sure: the speakers aren’t in do not disturb mode, the Home Assistant server is in the same network as the speakers.
The easiest way to check if the integration is working is to check My Google Activity
Limitations/known issues
- Multiple Google accounts are not supported.
- If you see the issued commands in My Google Activity
, the integration is working fine. If the commands don’t have the expected outcome, don’t open an issue in the Home Assistant Core project or the underlying library . You should instead report the issue directly to Google here . Examples of known Google Assistant API issues: - Media playback commands (other than play news, play podcast, play white noise, or play rain sounds) don’t work.
- Routines don’t work.
- Google Assistant automations that use
assistant.event.OkGoogleas a starter cannot be triggered. - Broadcast to specific rooms often doesn’t work for non-English languages.
- Commands that need to verify your identity through voice match do not work.
Configuration
On the configure page, you can set the language code of the interactions with Google Assistant. If not configured, the integration picks one based on Home Assistant’s configured language and country. Supported languages are listed here
Actions
Send text command
You can use the google_assistant_sdk.send_text_command action to send commands to Google Assistant.
| Data attribute | Optional | Description |
|---|---|---|
command |
no | Command(s) to send to Google Assistant. |
media_player |
yes | Name(s) of media player entities to play response on |
Examples:
action: google_assistant_sdk.send_text_command
data:
  command: "turn off kitchen TV"
# Say a joke on the living room speaker
action: google_assistant_sdk.send_text_command
data:
  command: "tell me a joke"
  media_player: media_player.living_room_speaker
You can send multiple commands in the same conversation context which is useful to unlock doors or open covers that need a PIN. Example:
action: google_assistant_sdk.send_text_command
data:
  command:
    - "open the garage door"
    - "1234"
You can get responses. Example:
action: google_assistant_sdk.send_text_command
data:
  command:
    - "tell me a joke"
    - "tell me another one"
returns:
responses:
  - text: |-
      What do you call a belt made of watches?
      A waist of time 👖 🕝
  - text: |-
      What's the most musical part of the turkey?
      The drumsticks 🍗
Action notify.google_assistant_sdk
You can use the notify.google_assistant_sdk action to broadcast messages to Google Assistant speakers and displays without interrupting music/video playback.
| Data attribute | Optional | Description | Example |
|---|---|---|---|
message |
no | Message to broadcast. | someone is at the front door |
target |
yes | Rooms (in Google Assistant) | bedroom |
Example to broadcast to all speakers:
action: notify.google_assistant_sdk
data:
  message: time for dinner
Example to broadcast to speakers in selected rooms:
action: notify.google_assistant_sdk
data:
  message: time for dinner
  target:
    - bedroom
    - basement
Conversation agent
You can add an assistant with the conversation agent set to “Google Assistant SDK”. See setup your assistant section here. Then you can converse with Google Assistant by tapping the Assist icon at the top right of your dashboard:
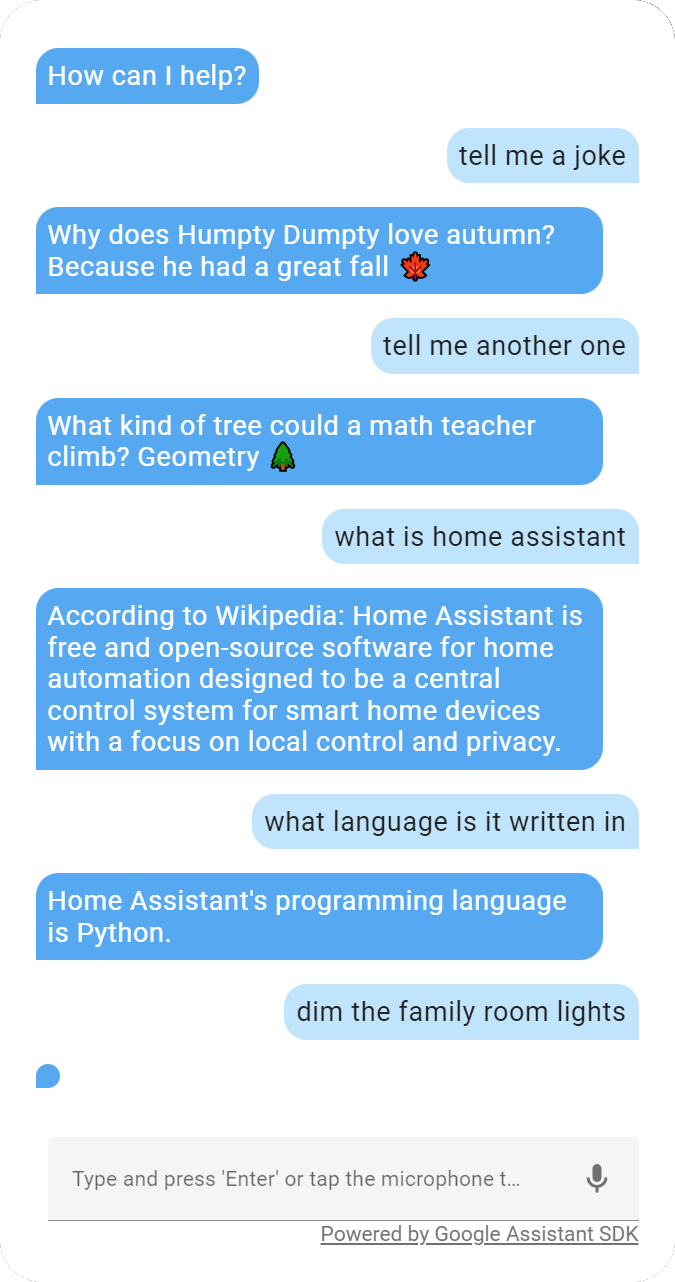
Or by calling the conversation.process action.
Note: due to a bug in the Google Assistant API, not all responses contain text, especially for home control commands, like turn on the lights. These will be shown as <empty response>. For those, Google Assistant responds with HTML and Home Assistant integrations are not allowed